Monday, August 31, 2015

Dream Big With Sandy

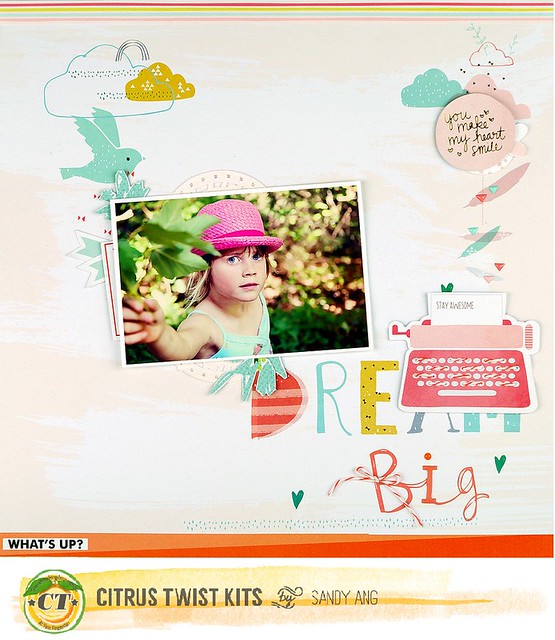
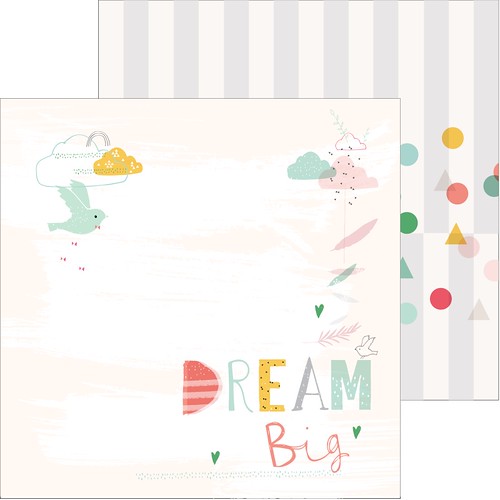
There are lots of fabulous pattern papers in this month's kits. My favourite has to be this Dream Big paper from Pinkfresh Studios that's available in Pattern Paper Play #2. With a perfect balance of white space and decorative motifs it's an ideal background paper for my layout. All I had to do is add a couple of  paper strips to the top and bottom, place the photo in the middle and embellish with some die-cut shapes from the August Celebrate Add-On Kit.

Dream Big CTK

If you love using a scene type pattern paper as the background to your layout, then check out the rest of the August kits. You'll find one with pastel balloons in the Main Kit and another with puffy white clouds against a blue sky in the Pattern Paper Play #1 Kit. Hope you enjoy scrapping with this month's kit and tomorrow we will be showing sneaks of the September kits on our fans facebook page.  
 
  
Pinkfresh

Sunday, August 30, 2015

Sunday Sketch with Emma

Hi everyone!  Emma here to share this weekends Sunday Sketch. Today's sketch is a 12x12 layout using a couple photo's.


One of the things I love about using a sketch when creating your page is that you don't always have to stick with the format exclusively.  You're able to take the basic design and mix it to suit your photo/layout.  In this instance my layout is 6x8 and rather than use 2 portrait type photos I had a single landscape photo and used my title and journaling to fill the remainder of that space.  This is the layout I came up with:


I absolutely adore the Pinkfresh Happy Things paper in the kits this month (well truth be told, I love that entire line of goodies) and it was perfect backdrop for my page.  I hand cut the title freehand - not perfect but that's half the point of hand cut lettering isn't it :)  For my embellishments I picked a few pieces from the Main and Embellishment kit to tie it all together.


I really love using the aqua tulle from the Main kit to add some dimension to the page.


Now it's your turn to take on this week's sketch!

We love to see what you do with our kits and sketches so please make sure to upload your projects to the Citrus Twist Gallery. And remember, by uploading your take on today's sketch to the gallery you will be entered to win a $5 Coupon to use on anything in the CTK Store! Remember to add "Sketch 8/30" to the title line :)

Em

Saturday, August 29, 2015

3 to Inspire with Chantal


It's time for another edition of our "3 to Inspire" series. We offer this new challenge every Saturday for those who need a little extra push to get scrapbooking, to keep scrapbooking, or those of you just looking for a challenge!

Your take on this challenge can be in the form of a layout or a PL spread and you'll want to include all 3 elements on your project.


Here are your 3 to Inspire:
      1. Add a large title
      2. Use stars
      3. Use multiples of the same photo

Enjoy!

Friday, August 28, 2015

Pocket Life sketch Friday with Alena

Hello everyone! It's Alena here today with Pocket Life Friday. I am going to share with you my new PL spread using the August PL kits+  Sprinkles Kit .


Now here are the sketches that I created for you!  One of the sketches  6x8 and two sketches 4x6.


For your chance to win, create a layout based on the sketches in this blog post, post your layout to our Gallery or our Facebook Fan Page by Friday, September  4th. Be sure to include PL 8/28 in the title!


Thursday, August 27, 2015

Pocket pages with Alena

Hi everyone, Alena here!
 I'm here sharing my pocket pages created with the August 2015 Kit  +August 2015 Sprinkles Kit.
This spread is my favorite. I also added a few embellishments from the June PL Kit.

Another spread:
I have several photos of the process.
 I like to mix pages  3x4  and 6x8. 


 I hope you are inspired to create something with your CTK kit today!


Tuesday, August 25, 2015

Tuesday Tutorial with Diane

Hi everyone, today I want to share with you how you can convert your handwriting or brush script into a cut file to use on your layouts.

Using either your favourite pen or a brush and ink, write your sentiment onto a blank piece of scrap paper. You might need to practice a few times to get it to look how you want it to. If you a using a pen, try something a bit thicker like a Sharpie so you can get a thicker title for your Silhouette to cut. You can use any colour but Black will make it much easier to get a good result.

Once dry, either scan or photograph your writing. I then import the scan into Photoshop. Adjust the levels (or contrast) until the white of the paper is as white as it can be and the black of your writing is as black as it can be. Don’t forget to save your new image as either a PNG or JPG file. If you don't have Photoshop, you can get similar results using a photo editor on your smartphone.

Then in your Silhouette Studio software, open the file you saved. Use the trace tool to select the area you want to cut. Don’t forget to uncheck “High Pass Filter” and then click “Trace”. Repeat this process with as many of your written words as you like. You can then select the background image and delete it. You are left with the cut files of your chosen words. You can adjust the size to suit, or even weld separate words into one. Don’t forget to save this file so you can use it when ever you like!

You can also download the cut files I created over on the Citrus Twist Kits Fan page.

On this layout, I used black adhesive-backed card to create my title. I can't get enough of all the wee dog elements in the August kits!


Monday, August 24, 2015

i capture with Marie-Pierre

Hi everyone! Marie here.  For this month's photography tip, I would like to share some thoughts with you about capturing the relationship between 2 people.

I have spent the last few weeks at my parents' house in Canada and I took several photos of my daughters in different ways but with the mere focus of capturing their friendship and their relationship and also their relationship with my parents and with friends. Here are some of my pictures, as well as my observations and some tips.

1. Try to capture them close to another.

Look at there heads, their hands. Pay attention to where they are looking. Are they looking in the same direction?


2. Look for opportunities to capture them when they interact with each other.

What do they like to do when they are together?


3. Try to get them when they are helping each other.

Here, my oldest daughter was reading the bedtime story to my youngest daughter. Try to vary your point of view. Shoot at an angle, from the top.


Or get at their eye level.


4. Position yourself behind your subject to capture what they are looking at.

Here my daughter was trying to tame my parent's very anxious cat. My mom gave her a chair and told her to sit and wait until the cat would get used to her. Even if the cat is way overexposed in my picture, I think that the connection between the cat and my daughter is palpable.


5. Take several pictures over a span of time to show the evolution of a situation.

This picture was taken several days after the above picture. My daughter was still trying to tame the cat and she could get way closer.


6. Don't disturb/interrupt your subjects. Let them do what they are doing. Hide the camera if you have to.

Here I was walking on the street and I could hear how my daughter and my friend's daughter were having fun together (despite the language barrier and the long time they hadn't seen each other). I discretely took my phone and snapped a picture on my side. We see half of my arm and the horizon line is not straight, but the expressions on their faces is priceless and worth so much more than a perfect picture!


7. Stay far away and shoot in the same direction the subjects are looking.

I love this picture because we were geocaching that day and on the picture we see that the boy in front of the group found something while the other kids are trying to see what it is. And, as the viewer of the picture, we can't see either what he found, but we would love to see, just like the other kids.


8. Try to capture an emotion. A real one, not a fake smile.

Here my daughter was on Skype with her dad who didn't come to Canada with us because he had to work. I love her real smile so much in that picture!


9. Always be ready! The opportunity for a picture can happen anytime. I almost always have my phone with me for that purpose or if I don't I know where to find it quickly.

My youngest daughter was afraid of the cats and that moment where she went to pet him on her own lasted exactly 3 seconds. It was just enough to snap the picture of this tender moment.


Here's another example of being ready all the time. This picture was taken when we woke up in the morning. You can tell by looking at my daughter's hair. lol I was really happy that I captured this moment of laughter. It was so spontaneous. Again, it's totally not the perfect photo. It's all grainy, the colors are off. But you know what, for me the emotion captured in a picture is worth so much more than a clear and technically perfect photo.


10. Lastly, I really want to take a minute to talk about selfies. Man, even if they are posed and everybody is looking at the camera, I feel like the selfies are highly showing the relationship between all the people on the picture. When we are all trying to squeeze in on that tiny space, that gives funny moments and very natural smiles sometimes.

This was the last picture taken at the airport before I left my parents to fly back home with my girls. I really like the feel of the picture and the energy between all of us.


I hope I could give you some ideas. If you do try some of my tips, please share them with us by tagging Citrus Twist Kits and/or mpcapistran on Instagram or you can share them on our Facebook Fan page.

Sunday, August 23, 2015

Sunday Sketch with Chantal

Hi everyone!

I'm back for another edition of "Sunday Sketch"

I was immediately inspired by the layout sketch because of it's white space design and the photo options. Instead of the suggested four small photos, I opted for a single large square (not exactly but close enough) one.


Since I always seem to be scrapping about my daughter and/or significant others, I shifted gears a bit and went for something a little more untraditional.

I've sported the same glasses for years now; a pair of black acetates but it's time for a switch and an update but I just can't make up my mind. The below photos were grabbed directly from my favourite manufacturer's website.


I started by printing some text directly onto my background in a light beige colour. I then cut out a piece of patterned paper slightly larger then my photo and adhered both onto my page, cut out the word "specks" with my Silhouette (in both lower case and caps), mixed them up and randomly glued them onto both my photo and the background. The tags were slipped behind it all with a little glue.


Although I would much prefer to own a typewriter, printing text onto a regular white sheet of printer paper normally does the trick. I just cut it out and then stitch it onto my project. The Seven Paper stickers were a perfect addition to my project. I simply added them directly onto my photo…a little pop of colour never hurt anybody, right?!

Saturday, August 22, 2015

3 to Inspire with Jessy

Hello there!! Jessy here to host today's 3 to Inspire challenge... 

To play along with today's challenge and to be eligible to win a small prize from the CTK Store, create a project that includes the following three prompts and upload it to our gallery making sure to include today's date (8/22) in the title.


This week's 3 to Inspire prompts are:

1. Create with at least 5 squares. 

2. Use medium (mist, ink, gesso).

3. Layered stickers.

Here is my take on the challenge using the August Main Kit + Embellishment kit:


I started with positioning the 5 patterned paper squares (measuring at 4"x4"), then I lightly applied gesso all over the 5 squares & sprinkled some mists too. I wanted to create a subtle look so that the papers do not scream too much attention & overpowered the photo. Once the gesso & mist was dried, I adhere the photo at the corner and layered a lot of stickers around it. And finally, I completed my layout with stamp images and journaling. 


Please join in the fun and upload your take on this challenge to our Citrus Twist Fan Page on Facebook, in our gallery, or on Instagram and tag us, @citrustwistkits. I can't wait to see what you do with the elements!


Thanks for stopping by!
Xoxo Jessy


Friday, August 21, 2015

Pocket Life Sketch Friday

Happy Friday! It's Tara here for our weekly installment of Pocket Life Friday. I have once again fallen head over heels in love with our August PL Kit, which has sold out, and our super affordable Sprinkles kit. Don't forget to read for details on our weekly giveaway associated with today's sketches at the end of the post.

We went on our first camping trip since moving abroad to England in July and had so much fun! The first layout shows how beautiful the lake was and how much we enjoyed our time in the sunshine!
I added in a Freckled Fawn wood veneer from my stash and my DIY enamel dot to the 4x6 PL card. I loved the Seven Baxter patterned paper from this month's kit so much! I also really love using stamps and used a few that we offered from current and past kits.


This next 6x8 mini layout was taken before I added in the journaling. My son ended up with an unexpected and accidental fat lip on our camping trip. He wanted to see the swelling for himself and how well the medication was working so we provided a few photos for him to see. He loves cats so much and the little wood chip cat had the perfect face for this memory. I used some alphas from past kits to add a pop of color and some hints of the patterned paper. The little pink word sticker was just the perfect touch to make it look like I added a tag or label.


And now time for the sketches.
Here are the 2 3x4 cards and a 4x6 card. I really focused more on the photos this time with a few hints of patterned paper, embellishments, and stamps.


And here is the 6x8 mini layout sketch: 


I hope these sketches can help spark your creativity to get to it this weekend and document those memories!

For your chance to win some happy mail, create a layout based on the sketches in this blog post. Then post your layout to our Gallery or on our Facebook Fan Page by Friday, August 28th and label it PL 8/21. The winner will be announced here on the blog later this month.

Thank you for stopping by and have a wonderful weekend!
Xxo, Tara